Motion design for Instagram Reels is no longer optional for editors and creators. Clean, fast motion can be the difference between a quick swipe and a follow. This tutorial walks through practical After Effects workflows so you can build scroll-stopping Reels efficiently, without overcomplicating your projects.Explore template access
📋 Table of Contents
Understanding Motion Design for Instagram Reels
What motion design for Instagram Reels means
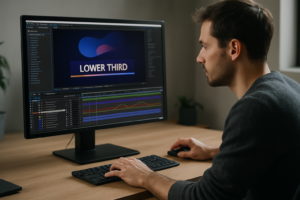
Motion design for Instagram Reels is the practice of using animated text, shapes, transitions, and visual effects to support short vertical videos. In After Effects, this usually means building 9:16 compositions that enhance message clarity and hook viewers in the first seconds.
Why it matters for editors and creators
On Reels, attention is brutal. You have milliseconds to make someone stop scrolling. Clean motion design helps by:
- Creating strong hooks with animated titles or graphical openers
- Highlighting key points with kinetic text and callouts
- Keeping pacing tight with rhythmic transitions and cuts
- Making low-production footage feel polished and intentional
Who benefits from motion-designed Reels
This workflow is ideal for:
- Video editors building vertical cutdowns from YouTube or client footage
- Motion designers delivering recurring Reels packages for agencies and brands
- Creators and social media managers who want a recognizable visual style
- Businesses worldwide that need consistent on-brand short-form content
Core pillars of Reels-focused motion
Compared with longer videos, motion design for Instagram Reels focuses on:
- Speed – snappy animations, often 6–12 frames for text in/out
- Clarity – legible type, strong contrast, readable on small screens
- Vertical framing – elements composed for 9:16, not cropped from 16:9
- Loop potential – many Reels benefit from seamless or soft loops
Once you understand these foundations, you can start shaping a reels motion graphics workflow that fits your editing style and production pace.
Building a Reels Motion Graphics Workflow
What is a reels motion graphics workflow
A reels motion graphics workflow is the repeatable process you use to go from idea to exported vertical video. For After Effects users, this means standardizing:
- Project structure and composition presets
- Template or preset selection
- Animation timing rules and visual language
- Export and delivery settings for Instagram
Key stages of an efficient workflow
- Planning – define message, duration, and key beats before animating
- Design system – choose fonts, colors, and reusable motion styles
- Build – assemble Reels in a master AE project with clean precomps
- Versioning – quickly adapt layouts for different hooks or A/B tests
- Export – render optimized vertical files ready for upload
Subtypes of Reels motion design
Different Reels formats benefit from different motion systems:
- Lyric and music Reels – animated lyrics, beat-synced backgrounds, and stylized overlays similar to dynamic lyric layouts
- App or product showcases – device mockups, UI widgets, and feature callouts
- Educational carousels turned Reels – slide-based layouts with kinetic text
- Trendy meme formats – fast typographic punches, zooms, and glitchy transitions
Matching workflow to intent
Consider what the viewer wants when they tap your Reel:
- Entertainment – more expressive typography, stylized backgrounds, music sync
- Education – clear lower-thirds, chapter cards, and minimal distractions
- Promotion – clean product framing, price tags, and subtle movement
Using templates as building blocks
Instead of designing every element from scratch, many editors build a library of reusable After Effects templates and project snippets, from widget-like overlays inspired by social media widgets to stylized text animations. The goal is a library that matches your brand tone so every new Reel starts at 60% done.
Once your reels motion graphics workflow is defined, you can focus on solving specific problems that usually slow editors down.
Common Motion Design Mistakes in Reels
Rushing into After Effects without a plan
Opening a new 1080×1920 comp and improvising everything leads to inconsistent pacing and clutter. Spend a minute mapping hook, core message, and CTA beats first.
Messy compositions and precomps
Untitled comps and dozens of loose layers create chaos. Typical issues:
- Layers named “Shape Layer 37” or “Text 12”
- No separation between background, text, and effects
- Nested precomps with default names and mixed frame rates
Checklist to avoid messy projects
- Name comps by function: “01_Hook”, “02_Body”, “03_Outro”
- Group and precomp related elements: “Titles_MAIN”, “BG_Elements”
- Keep one frame rate (often 30fps) across the whole project
Poor animation timing
Common timing mistakes:
- Animations that ease in too slowly for 7–15 second Reels
- Text on screen for too short or too long
- Keyframes spaced unevenly, breaking rhythm with the audio
Timing checklist
- Hook text in within 4–8 frames, out within 6–10 frames
- Keep key messages on screen at least 1.5–2 seconds
- Use audio waveforms to align accents and transitions
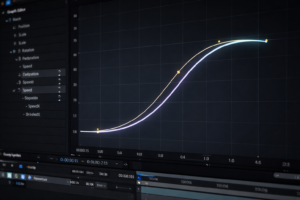
Ignoring the graph editor
Linear motion makes Reels feel amateur. Overly exaggerated curves can feel jittery. Aim for:
- S-curves for smooth in/out of texts and shapes
- Ease values that feel snappy but not jarring
- Consistent curves across all elements in the same Reel
Overusing effects and plugins
Stacking heavy blurs, glow, and third-party plugins kills playback and render times on short deadlines. Use:
- Simple shape layers and masks first
- Built-in effects where possible
- Pre-rendered elements for repeated complex animations
Forgetting motion blur and pixel density
Either no motion blur or too much can ruin clarity on phones. Check:
- Motion blur toggled only on fast-moving layers
- Text remains sharp and legible when moving
Ignoring safe areas for vertical
Captions, UI overlays, and Instagram interface can collide. Keep text away from the very bottom and top so likes, comments, and usernames do not cover it.
By spotting these mistakes early, your motion design for Instagram Reels becomes cleaner, easier to iterate, and safer to hand off to clients or collaborators.
Choosing the Right Approach for Each Reel
Start from the goal of the Reel
Different goals require different motion strategies. Before animating, decide whether your Reel is meant to build brand, drive clicks, entertain, or explain something. This will guide how loud or minimal your motion design should be.
Editorial and educational Reels
For talking-head explainers, case studies, or breakdowns, consider:
- Subtle lower thirds and topic headers
- Sidebars or overlays that highlight key points
- Minimal transitions, focusing on clarity and legibility
Entertainment and music-based edits
For music-driven Reels similar to stylized lyric pieces or music moments, use:
- Beat-synced lyrics and background pulses
- Color and glow changes on musical accents
- Camera shakes and zooms aligned to the rhythm
Product and app promo Reels
When showcasing apps, dashboards, or widgets, lean into:
- Clean device frames and UI mockups
- Short, bold feature callouts
- Side-by-side before / after or old way / new way layouts
Ads vs organic content
For paid ads, motion should be extremely intentional:
- Immediate hook with a problem statement or bold benefit
- Simple text hierarchy and minimal on-screen elements
- Clear CTA at the end with enough screen time
For organic Reels, you can experiment more with style and pacing, as long as the message is still readable.
Using reference and social insights
Study high-performing Reels from your niche and analyze:
- How long the hook animation lasts
- Where captions and labels are placed
- How busy or minimal the graphics are
Social marketing blogs such as specialized Instagram strategy guides can help you understand how your motion decisions interact with audience behavior and content strategy.
Where templates and systems fit
Once you understand goals and content types, you can standardize:
- Title styles for all hooks and intros
- Lower-third systems for names and topics
- Transition packs for scene changes and B-roll
Working from reusable structures frees you to focus on story and performance instead of redrawing the same animations for every Reel.Speed up your Reels builds
Step-by-Step Reels Template and Workflow Guide
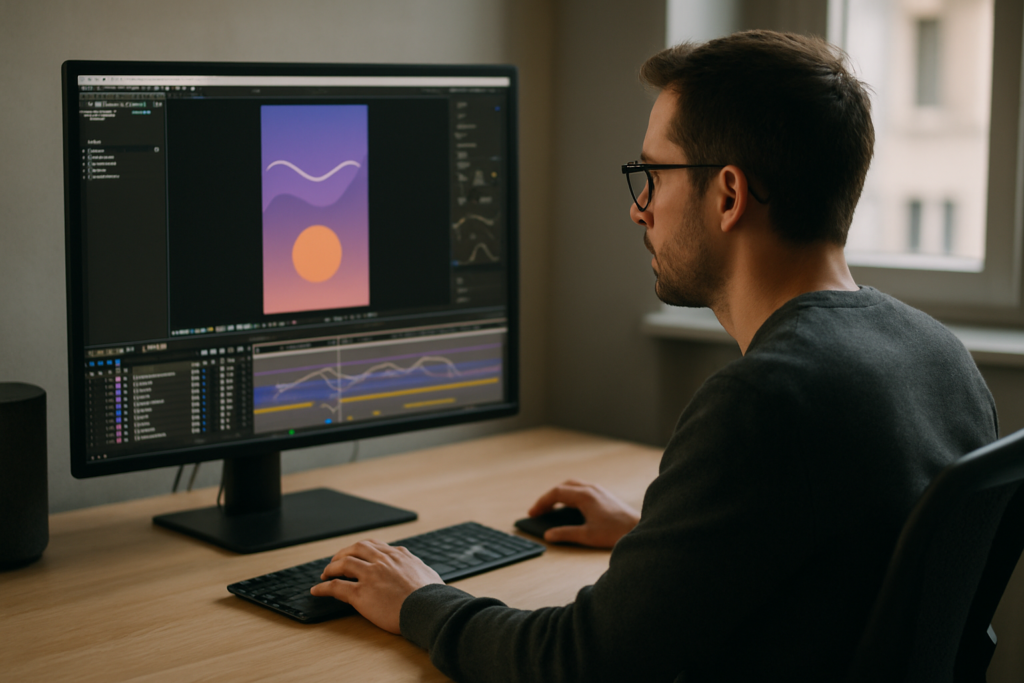
Project setup and composition basics
Begin by creating a master project for your Reels series. Use:
- Resolution: 1080×1920 (or 2160×3840 for 4K vertical)
- Frame rate: 25 or 30 fps (stay consistent across all comps)
- Duration: 15–30 seconds depending on your average Reel length
Create base comps such as “REEL_Master”, “REEL_Hook”, and “REEL_Outro”. This makes your motion design for Instagram Reels predictable and reusable.
Importing and checking templates
When you bring in After Effects templates, check:
- AE version – make sure it supports your installed version
- Frame rate – match your master project to avoid timing drift
- Resolution – convert 16:9 templates to 9:16 by nesting and reframing
Nesting wide comps inside a vertical master comp allows you to reposition elements while keeping original animations intact.
Keyframe organization and naming
Within each template or custom comp, clean up the timeline:
- Rename layers: “HOOK_Title_Main”, “BG_Gradient”, “CTA_Button”
- Group related layers into precomps: “HOOK_Text”, “CTA_Block”
- Align keyframes to markers for beats or script lines
Use labeled markers on the timeline (e.g., “Hook”, “Benefit 1”, “CTA”) so you can adjust timing globally without hunting through layers.
Precomps for modular Reels
Think of your project as modular blocks:
- Hook module (0–2 seconds)
- Body module (2–10 seconds)
- Proof or example module (optional middle section)
- CTA module (last 2–3 seconds)
Each block can be its own precomp. Swap, disable, or reorder modules to quickly create new Reels from the same system.
Performance and preview tips
To keep your reels motion graphics workflow fast:
- Work at Half or Quarter resolution during layout
- Disable motion blur and heavy effects until final polish
- Cache short segments and use region of interest while adjusting timing
- For footage-heavy Reels, create proxies or pre-render stabilized clips
Managing plugins and dependencies
Before adopting a template, confirm which plugins it uses. Prefer:
- Native effects or widely used plugins available on most setups
- Alternate versions of templates that use no extra plugins
- Pre-rendered particle or glow passes instead of live heavy effects
For example, if you are animating UI-style overlays like in app widgets or finance dashboards similar to sleek payment widgets, try to keep complex elements pre-rendered to avoid slow previews.
Customization workflow: colors, type, and transitions
To stay efficient across many Reels:
- Centralize color controls in a single adjustment or control layer
- Create character styles for titles, subtitles, and captions
- Standardize transition durations (e.g., 6 frames in, 6 frames out)
When using templates, look for a “Controls” comp or layer that lets you tweak brand colors and fonts globally. Test your text sizes on an actual phone screen to ensure legibility.
Timeline and audio alignment
For music or voice-over-driven Reels:
- Drop markers on audio beats or phrase starts
- Align key text in/out animations to those markers
- Use subtle scale or position bumps on major beats
This turns your template system into a rhythm-aware editing tool instead of a static layout.
Use cases: from Reels to other formats
Once your modular system is in place, you can reuse it for:
- Shorts and TikToks with minor tweaks to text and timing
- Product promos with swapped footage and price tags
- Cinematic mood edits using textured overlays or stylized transitions
Keep one master vertical project for each series or client. Duplicate that project when starting a new campaign to avoid losing your refined systems.
Advanced Motion Systems and Long-Term Workflow
Building a reusable style system
To scale motion design for Instagram Reels across campaigns, move from individual comps to a full style system:
- Create a color palette layer with swatches visible in the comp
- Define one or two title animations used in every Reel
- Standardize lower-third and caption treatments
Document these choices in a simple text layer or notepad file in your project folder so collaborators can follow the same rules.
Styleframes and motion references
Before you animate, lock in styleframes that show:
- Hook frame with title and background
- Body frame with text hierarchy and supporting graphics
- CTA frame with clear call-to-action elements
These static frames guide your animation decisions and keep the entire series visually coherent.
Modular transitions and reusable blocks
Build a small library of transition precomps:
- Vertical wipes or slides between talking points
- Glitch cuts or zooms for energetic edits
- Soft fades or blur transitions for calmer content
Drop these precomps between sections of your Reel instead of rekeyframing every time. You can also adapt stylized elements from more experimental layouts, like those seen in music-driven projects similar to animated lyric visuals, and reskin them for your brand.
Quality control and consistency checks
Before exporting, run a quick QC pass:
- Check spelling, text alignment, and safe areas
- Verify that all comps share the same frame rate
- Compare colors and fonts with previous Reels from the same series
- Ensure motion blur is consistent across elements
Export and render considerations
For Reels, you want solid quality with manageable file size:
- Export to a high-quality intermediate (e.g., visually lossless codec) from After Effects
- Transcode to H.264 or HEVC in a dedicated encoder if needed
- Use 1080×1920 resolution and match your original frame rate
- Keep bitrate reasonable to avoid compression artifacts after Instagram re-encoding
Dynamic link and project weight
If you use dynamic link to an editing app, be aware:
- Heavy AE comps can slow down your edit timeline
- Nested effects and large textures increase RAM usage
- Pre-rendered segments (ProRes or similar) often play back more reliably
Archive older Reels by collecting files and trimming unused assets so your main project stays lean. Over time, this disciplined approach makes your reels motion graphics workflow robust enough for high-volume content calendars.
Search-Driven Ideas for Reels Motion Design
Leaning into search intent around Reels
Editors and creators search for very specific motion solutions. You can shape your workflow and content plan around these recurring questions.
Common search-style questions and quick answers
- “Best settings for vertical After Effects Reels” – Use 1080×1920, 25–30 fps, square pixels, and at least 8-bit color. Keep one master comp as your template.
- “How to sync text to music in Reels” – Show audio waveforms, add markers on beats or lyric starts, and snap text in/out keyframes to those markers.
- “Simple motion design ideas for Instagram Reels” – Start with animated headers, subtle background gradients, and sliding lower thirds rather than complex 3D scenes.
- “How to loop motion graphics Reels” – Design the first and last frames to match, or animate a ping-pong loop on background elements so the cut feels soft.
- “How to reuse templates for multiple Reels” – Build a modular comp structure with dedicated hook, body, and CTA precomps, then duplicate and swap text and footage.
- “Fix choppy animations in After Effects Reels” – Increase frame rate to 30, adjust graph editor curves, and enable motion blur for fast moves while keeping text legible.
Planning content around FAQs
Use these recurring questions to guide your next Reels series: each Reel can answer one question visually using your established motion system, making it easier to batch-produce content.
From Concepts to Consistent Reels Output
Bringing everything together
Motion design for Instagram Reels works best when you combine a clear goal, a consistent design system, and a practical After Effects pipeline. You start by defining your message and hook, use modular templates or prebuilt systems to speed up layout, then refine timing with the graph editor and audio markers.
Focusing on what matters most
For editors and motion designers, the real wins are:
- Cleaner, more legible animations that respect vertical screen constraints
- Shorter build times thanks to reusable precomps and templates
- Predictable results across series and campaigns
Next steps for your workflow
Take one existing Reel and rebuild it using a structured reels motion graphics workflow: master comp, hook/body/CTA modules, standardized typography, and carefully tuned easing. Once you are confident in that system, duplicate it for your next batch of Reels and keep refining timing, colors, and transitions based on performance.
With a solid motion pipeline in place, you can focus on creative decisions and storytelling while still meeting demanding posting schedules and client expectations worldwide.Get started with Reels templates
Conclusions
A structured After Effects workflow turns motion design for Instagram Reels from guesswork into a repeatable system. Focus on clear goals, modular templates, and tight timing. As you refine your reels motion graphics workflow, you will ship more content in less time while keeping visuals consistent and professional.
FAQ
What resolution and frame rate should I use for Instagram Reels in After Effects?
Use 1080×1920 (9:16) at 25 or 30 fps, and keep the same frame rate across all compositions and templates for consistent timing and smoother motion.
How long should motion animations be in a Reel?
Keep hook animations very short, around 4–8 frames for text in, and 6–10 frames for text out. Aim to show key messages on screen for at least 1.5–2 seconds.
How do I adapt horizontal templates to vertical Reels?
Nest the original 16:9 comp into a new 1080×1920 comp, scale and reposition elements to fit 9:16, and then adjust text and UI layouts for vertical reading.
How can I keep my Reels project organized in After Effects?
Use clear comp names, group related layers into precomps, label modules like Hook, Body, and CTA, and keep frame rate and resolution consistent across the project.
What export settings work best for Instagram Reels?
Render a high-quality master from After Effects, then encode H.264 or HEVC at 1080×1920, matching your project frame rate and using a moderate bitrate to avoid artifacts.
How do I sync motion design to music for Reels?
Show the audio waveform, add markers on beats or lyric starts, and align keyframe changes for position, scale, or opacity to those marker points for tighter rhythm.