Smooth transitions define the difference between amateur edits and premium motion design. If you want cinematic flow, controlled pacing, and seamless scene changes, mastering how to create smooth transitions in After Effects is essential. This practical smooth transitions tutorial AE approach focuses on precision, timing, and motion consistency.
Most editors learn After Effects by collecting effects: a blur here, a glitch there, maybe a quick zoom and a shake. But smooth transitions are not “effects-first.” They’re “motion-first.” The visual polish you feel in top-tier edits comes from consistent motion logic: what moves, why it moves, how fast it moves, and how the viewer’s eye is guided from one scene to the next without confusion.
In this guide, you’ll learn how to create smooth transitions in After Effects with a repeatable system. We’ll cover foundational motion principles, keyframe shaping in the Graph Editor, motion blur control, whip transitions, mask reveals, adjustment layers, pre-comps for clean timelines, and finishing steps that make transitions feel expensive. You’ll also get practical mini-recipes you can adapt to any footage style: cinematic, commercial, YouTube, reels, product edits, UI animation, and more.
The goal is not to memorize a single “signature transition.” The goal is to build a workflow that consistently produces clean, premium results under real deadlines. That’s what separates a cool transition you made once from a professional transition you can make anytime.
1. Start with Intentional Motion
Transitions should be motivated by movement. Before adding effects, analyze object direction and velocity. Align outgoing motion with incoming elements to maintain visual continuity. Random movement breaks flow.
Get unlimited After Effects templatesIntentional motion means every transition has a reason. Maybe the camera pans right, so your next shot should “enter” from the right. Maybe your subject turns their head, so the next scene follows that motion direction. Maybe a product rotates, so your transition uses rotation momentum to “spin” into the next scene. When your motion is motivated, the viewer’s brain accepts the transition as natural, even if it’s stylized.
Here’s a quick checklist you can apply before you touch any effects:
- What is the dominant direction? Left, right, up, down, diagonal, push-in, pull-out.
- What is the visual anchor? The subject, a logo, a face, a bright highlight, text, or a high-contrast edge.
- What is the eye path? Where will the viewer look during the last 10 frames and the first 10 frames of the next shot?
- What is the energy level? Calm, medium, intense. Your transition speed should match it.
- What’s your cut motivation? Music hit, action peak, gesture, camera move, or story beat.
If you can answer those questions, your transitions will immediately feel more “designed” even without advanced effects. Most “bad transitions” are not bad because the blur is wrong. They’re bad because the motion doesn’t make sense.
One practical method: pick a single motion theme for a sequence. For example, if the edit is mostly lateral movement, keep your transitions lateral. If you switch direction every time (right, then up, then left), the viewer feels “thrown around.” Smooth transitions often feel smooth because they are consistent.
Practical exercise: the 12-frame handoff
Take two clips. Choose a 12-frame region where the first clip exits and the second clip enters. Your goal is to make the viewer’s eye travel in one continuous path across those 12 frames. Use only Position and Scale at first. No blur, no glow, no distortion. If the handoff feels good with just transform properties, everything you add later becomes a bonus—not a rescue mission.
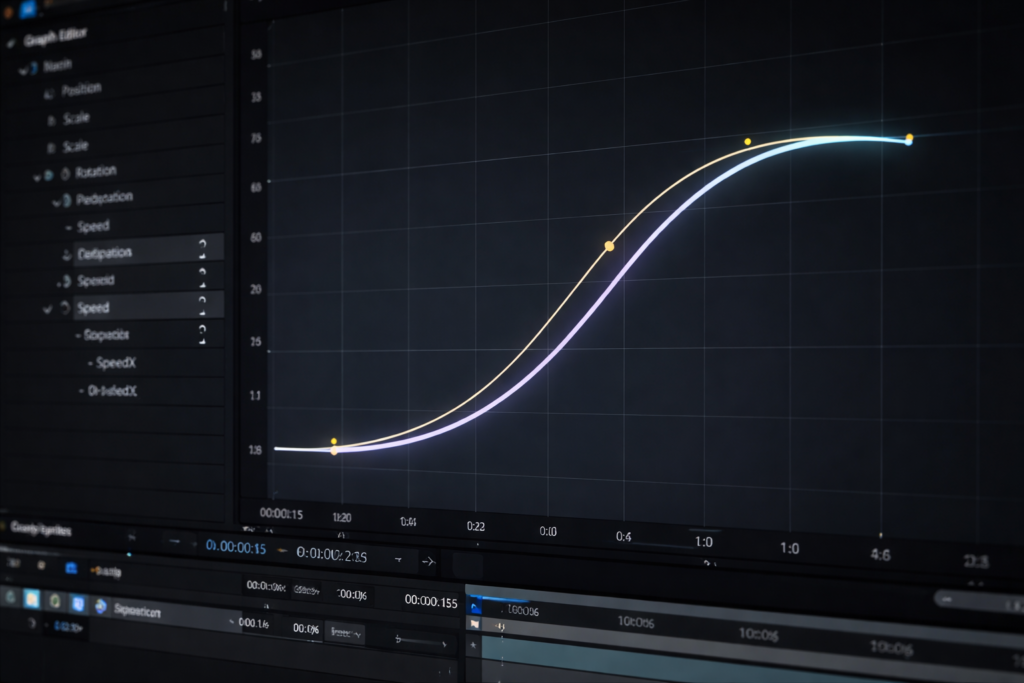
2. Master Easy Ease and Speed Graph
Press F9 to apply Easy Ease, then refine in the Graph Editor. Avoid linear keyframes. Use influence adjustments to create natural acceleration and deceleration. Clean curves produce premium results.

Easy Ease is the door. The Graph Editor is the room where professional motion happens. If you only use linear keyframes, your transitions will look robotic: motion starts instantly, stops instantly, and the viewer feels the “mechanics.” Smooth transitions are about controlled acceleration and deceleration that match how cameras and objects move in real life.
In After Effects, you have two major graph approaches:
- Speed Graph: Controls how fast an object moves over time (great for natural motion and cinematic transitions).
- Value Graph: Shows property values over time (useful for precise overshoots, arcs, and complex timing).
For most smooth transitions tutorial AE workflows, the Speed Graph is where you spend your time. The reason is simple: transitions are often about feeling, not math. The speed curve is the feeling.
What a “premium” curve looks like
A premium curve typically has:
- A short ramp-up (motion starts smoothly, not instantly).
- A clean peak (fastest point occurs near the middle or on a beat).
- A controlled ramp-down (motion lands softly, not abruptly).
But don’t over-smooth everything. If your transition is supposed to feel snappy, you can create a sharper peak. Smooth doesn’t mean slow. Smooth means “no awkward jumps.”
Timing strategy: the peak velocity cut
Many professional transitions cut at peak velocity. Why? Because when motion is fastest, details are harder to perceive. That gives you permission to hide the cut. Build your movement so it accelerates into a fast moment, cut at that fast moment, and then decelerate into the next shot. This is the backbone of whip transitions, push transitions, and fast zooms.
Common mistakes that kill smoothness
- Too much easing: If motion takes forever to start, it feels sluggish. Your curve should still move.
- Uneven keyframe spacing: If keyframes are placed randomly, the transition feels random.
- Overlapping peaks: If multiple properties peak at different times (position peaks at frame 8, blur peaks at frame 12, scale peaks at frame 6), the transition feels messy. Align peaks intentionally.
- Uncontrolled influence: Dragging handles without a plan can create weird bumps or sudden slowdowns.
Mini-recipe: Smooth push transition (transform-only)
- Place clip A and clip B in a comp.
- Animate clip A Position to move left (or right) over 10–16 frames.
- Animate clip B Position to start off-screen and move in, matching direction.
- Easy Ease both sets of keyframes.
- In the Speed Graph, make both clips peak at the same frame.
- Add a slight Scale change (2–4%) to both clips to increase depth.
If this feels smooth without blur, you’re already on a professional foundation.
3. Use Motion Blur Strategically
Enable motion blur on fast transitions. It softens abrupt cuts and adds realism. Increase shutter angle slightly for more cinematic energy, but keep control. Overuse looks cheap.
Motion blur is one of the easiest ways to upgrade transitions, but it’s also one of the easiest ways to ruin them. Smooth transitions aren’t “blur everywhere.” They’re “blur where speed justifies it.” In real life, fast movement smears. In motion design, blur acts like a glue that hides harsh edges and makes quick movement feel natural.
Where motion blur helps most
- Whip transitions with fast lateral movement.
- Zooms and push-ins that happen over 6–12 frames.
- Rotation-driven transitions (spin, twist, flip) where edges move quickly.
- Mask reveals with fast expansion or fast position.
Where motion blur can hurt
- Text that becomes unreadable during key moments.
- UI-style motion graphics where sharpness is part of the design.
- Subtle transitions where blur adds “fog” instead of polish.
Shutter settings and “cinematic feel”
After Effects motion blur is affected by comp settings (shutter angle/phase) and layer motion blur toggles. A higher shutter angle creates more blur. More blur can feel cinematic if the motion is fast and controlled. But too much blur makes your transition look like a cheap plugin. The sweet spot depends on footage and speed. The key is to judge it at 100% scale and real playback speed.
To keep control, test your transition in three stages:
- No blur: Does the motion feel good?
- Default blur: Does it become smoother without hiding important detail?
- Adjusted blur: Slightly increase blur only if it improves clarity (yes, clarity—because it hides distracting sharp edges during speed).

4. Build Whip Transitions with Directional Blur
Create a fast position shift, add directional blur aligned with movement, then mask or cut on peak velocity. This is a core technique in any smooth transitions tutorial AE workflow.
The whip transition is popular because it’s flexible and forgiving. You can use it with footage, motion graphics, typography, product shots, or anything else. The idea is simple: simulate a fast camera whip (pan) so the middle of the move becomes a streak of motion where you can hide the cut.
Whip transition anatomy
- Acceleration: The camera (or the layer) speeds up quickly.
- Peak velocity: The motion is fastest and detail is smeared.
- Handoff: Cut to the next shot at the peak.
- Deceleration: The next shot slows down into place.
Directional blur: use it like seasoning
Directional blur enhances the smear during peak velocity. The trick is aligning the blur direction to the movement direction. If the blur direction doesn’t match the move, the viewer’s brain notices the mismatch—even if they can’t explain it. That mismatch is one of the reasons transitions feel “fake.”
Mini-recipe: Clean whip pan between two clips
- Place clip A above clip B (or side-by-side layers in a comp).
- Animate clip A Position quickly off-screen over 8–12 frames.
- Animate clip B Position quickly into frame over the same 8–12 frames.
- Apply Easy Ease and shape both curves so the peak happens on the same frame.
- Add Directional Blur to each clip or to an adjustment layer.
- Animate blur amount: low at start → high at peak → low at end.
- Cut or overlap clips at the peak velocity frame.
Extra polish: add a subtle camera shake (very small) only during the peak velocity frames. Keep it minimal. A tiny shake can sell the “camera whip” illusion.
Whip transition variations you can create fast
- Whip + zoom: Add a slight scale increase during the whip for extra punch.
- Whip + rotation: Add 2–6 degrees rotation for a more dynamic feel.
- Whip + light leak: Add a quick exposure bump or glow on an adjustment layer at the peak.
- Whip + match cut: Align a shape or subject position so the incoming shot matches the outgoing framing.
Ready to evolve?
Get instant access to everything and start creating professional motion today.
Join Olaf Motion Lab5. Layer Scale and Rotation Subtly
Micro scale changes (103–105%) combined with slight rotation add depth. Keep values subtle. Premium transitions rely on control, not exaggeration.
If your transitions feel “flat,” subtle scale and rotation can add depth without making the effect obvious. Think of it like camera movement: real cameras rarely move in a perfectly straight line without any change in perspective. A tiny scale push-in mimics a camera that slightly moves forward. A tiny rotation mimics handheld energy or a slight pivot.
How subtle is subtle?
- Scale: 2–5% is usually enough.
- Rotation: 1–4 degrees is usually enough.
- Anchor point: Keep it intentional. Rotating around a random anchor looks wrong.
One pro-level trick: align your micro-scale peak with your motion peak. If position peaks at frame 10, scale should peak around frame 10 too. When peaks align, the viewer perceives one unified motion instead of separate effects.
Use scale/rotation to guide attention
Scale and rotation can also guide the viewer’s eye toward the next focal point. If your incoming scene has a subject on the right side, a subtle push that ends with framing slightly right helps the viewer land where you want them to look.
However, be careful with 4K footage and sharp details: scaling too much can reveal softness, especially if the footage isn’t high resolution. If you need larger scale changes, consider working with higher-res sources or precomps with appropriate scaling strategy.
6. Mask and Reveal with Precision
Animate masks with feather and expansion to reveal the next scene naturally. Use track mattes for advanced compositions. Clean edges matter.
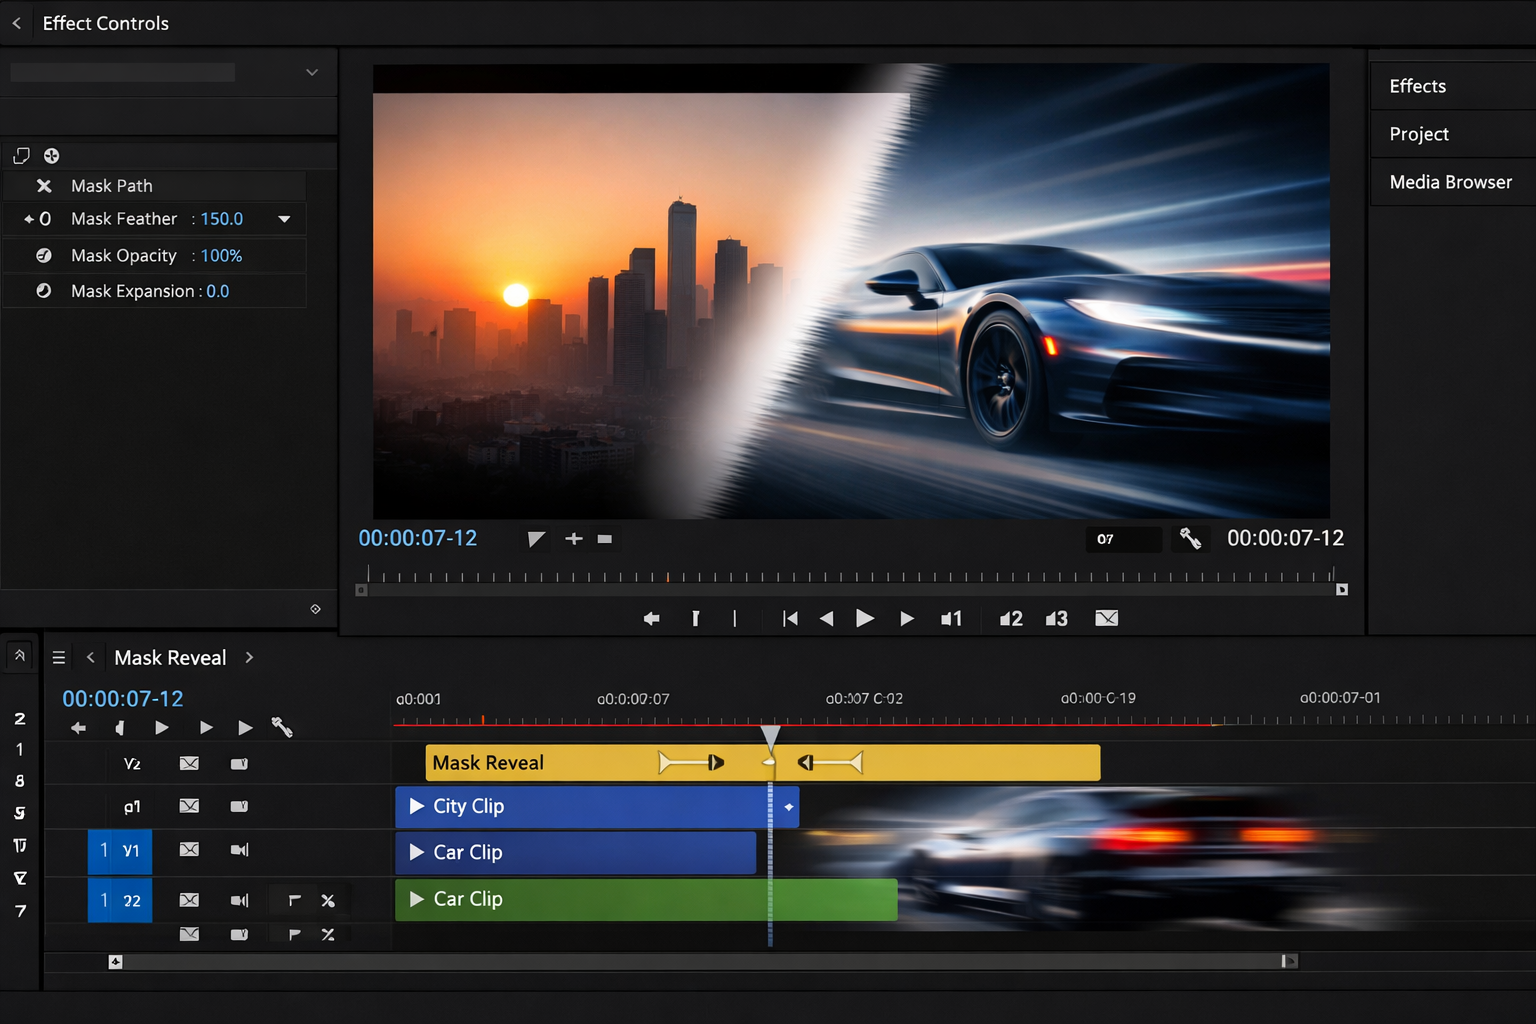
Mask transitions are timeless because they create controlled reveals. Unlike whip transitions (which rely on speed and blur), mask reveals can be smooth even at slower pacing. They’re perfect for brand videos, product reveals, title sequences, and any edit where you want the transition to feel intentional and designed.
Principles of smooth mask reveals
- Feather matters: Hard edges look like a wipe. Slight feather can make it feel more natural.
- Motion matters: If the mask moves like a robot, the reveal feels robotic. Shape your mask movement in the Graph Editor.
- Match scene contrast: If the incoming scene is bright and the outgoing is dark, consider a subtle exposure bridge on an adjustment layer.
Mask reveal types that look premium
- Shape-based reveal: Circle, rectangle, custom shape that matches your brand style.
- Object reveal: Use an object (hand, door, car, phone) to mask into the next scene.
- Light reveal: Use a bright flare or highlight as a “mask” moment.
- Texture reveal: Use noise/grain/fractal texture as a matte for organic reveals.
Track matte workflow for clean control
Instead of animating masks directly on footage, you can create a matte layer (shape or texture) and use it as a track matte for the incoming clip. This keeps your footage clean, your mattes reusable, and your timeline easier to manage. It also makes it simple to tweak feather, blur, and animation without touching the footage layer.
Mini-recipe: Organic texture reveal
- Create a solid layer above clip B.
- Add a texture generator (like fractal noise) to the solid.
- Increase contrast to create a clearer matte region.
- Animate the evolution/offset to create movement.
- Use that solid as an alpha matte for clip B.
- Feather/blur the matte slightly for a smoother edge.
This creates a reveal that feels less “digital wipe” and more like a natural film overlay.
7. Use Adjustment Layers for Global Control
Apply blur, color shift, or exposure changes on adjustment layers during the transition frame range. This keeps your timeline organized and professional.
Adjustment layers are the secret weapon of clean workflows. Instead of applying effects to multiple clips, you apply them once on an adjustment layer and control the timing. This approach is faster, cleaner, and easier to tweak later. It’s also the foundation of professional template packs: effects are modular, contained, and reusable.
Best effects for adjustment-layer transitions
- Directional blur: Great for whips.
- Gaussian blur: For soft bridging moments.
- Exposure/levels: For light hits and brightness bridges.
- Color shift: For stylized transitions between scenes.
- Chromatic aberration: Use lightly for modern punch (keep it subtle).
- Glow: Great on bright highlights, not on everything.
Adjustment layers also make it easier to limit the effect to only the transition frames. If blur is applied to your entire clip, you lose sharpness where you need it. If blur is isolated to 6–12 frames on an adjustment layer, you get the benefits without the downside.
Pro tip: stack small effects, not one heavy effect
One heavy effect can look artificial. Several subtle effects, timed well, often look more realistic. For example, instead of a massive blur, combine a moderate blur, a tiny exposure bump, and a slight scale push—only during peak velocity. The viewer won’t notice the individual ingredients, but they’ll feel the polish.
8. Optimize with Pre-Compositions
Pre-compose complex sequences to avoid clutter. Smooth transitions depend on clean structure and timing discipline.
Pre-comps are not just for organization. They also help you control motion consistency across a sequence. When your timeline is a mess, you lose the ability to see timing clearly. When timing becomes unclear, transitions get sloppy.
When you should pre-compose
- When you have multiple layers forming a single “shot” (text + shapes + footage).
- When a transition uses multiple effects that you want to treat as one unit.
- When you want to reuse a transition setup across multiple scenes.
- When you need to apply global effects to a group (like blur on a cluster of layers).
Pre-comp strategy for transitions
A clean approach is to pre-compose each “scene” into its own precomp, then build transitions between precomps. That way, your main timeline is basically scene blocks, and your transitions are easier to see and adjust. This is especially powerful for larger edits where you have multiple transitions in a row.
Also: pre-comps make it easier to keep consistent motion blur and consistent transform logic. You can animate the precomp as a “camera move,” and keep internal elements stable.
9. Match Cut Fundamentals
Smooth transitions aren’t always about motion effects. Sometimes the smoothest transition is a cut that feels invisible because the composition matches. A match cut can connect two scenes without the viewer noticing the seam—because framing, motion, and subject placement make the cut feel inevitable.
What makes a match cut work
- Matching shapes: A circle becomes another circle (sun → light → logo).
- Matching motion: A pan continues in the next shot.
- Matching framing: Subject stays in the same position across the cut.
- Matching luminance: Bright-to-bright or dark-to-dark feels smoother.
After Effects helps because you can nudge position, scale, and rotation to align elements more precisely than in a standard editor. Even small alignment improvements can make a cut feel smoother.
Mini-recipe: Invisible match cut with micro push
- Freeze-frame the last frame of clip A and the first frame of clip B (for analysis only).
- Compare subject placement. Adjust clip B position/scale to match clip A framing.
- Add a subtle push-in over 8 frames across the cut so the viewer feels continuity.
- Add slight motion blur only if movement is fast enough to justify it.
This technique is simple, but it’s extremely effective, especially in cinematic edits.
10. Use J-Cuts and L-Cuts for Audio-Driven Smoothness
Even if this is a visual guide, audio matters. Sometimes the transition feels rough because the audio cut is rough. Smooth transitions often rely on audio leading or trailing the visual cut.
Quick definitions
- J-cut: Audio of the next scene starts before the visual cut.
- L-cut: Audio of the current scene continues after the visual cut.
In motion design edits, you can apply the same logic with sound effects, impacts, whooshes, and ambience. If the whoosh starts slightly before the peak velocity frame, the viewer expects a transition. If the whoosh ends slightly after, the transition feels “finished.” These micro timing details are a major part of what makes a transition feel professional.
Audio timing tip
When using whooshes, align the loudest moment of the whoosh with the peak velocity of the transition. If the whoosh peaks too early or too late, the transition feels disconnected.
11. Camera Movement Illusions: Fake 3D with 2D Layers
You don’t always need a real 3D camera to create smooth, dimensional transitions. Many premium edits use fake depth: subtle parallax between foreground and background layers, combined with a camera move. This creates a “cinematic” feel without heavy 3D setups.
How to fake depth quickly
- Duplicate your clip and mask out a subject (rough is okay if motion is fast).
- Blur the background layer slightly.
- Scale the background a bit larger so edges don’t show.
- Move the subject layer slightly faster than the background.
Now you have parallax. Transitioning between two parallax shots feels premium because the viewer perceives depth continuity.
12. Speed Ramping for Controlled Energy
When editors talk about “smooth pacing,” they often mean speed control. In After Effects, you can simulate speed ramps by time remapping (or by prepping time-based edits elsewhere and enhancing them in AE). Smooth transitions benefit from speed changes because you can accelerate into a cut and slow down into a new scene.
Get unlimited After Effects templatesHow speed ramps support smooth transitions
- They create a natural build-up into a transition moment.
- They allow you to cut when detail is less readable.
- They give the next shot breathing room after the cut.
But speed ramping must be controlled. If you ramp too hard without matching motion blur and timing, it feels like a glitch. Smooth speed ramps usually have soft easing and avoid extreme changes unless the style demands it.
13. Combining Transitions Without Overloading the Viewer
A common mistake in modern edits is stacking too many transition types back-to-back: whip, then glitch, then zoom, then spin. Even if each transition is “cool,” the sequence can feel chaotic. Smoothness is not only about a single transition—it’s about how transitions relate to each other across the edit.
Three ways to keep variety while staying smooth
- Use a consistent motion direction: Even if transition styles differ, direction consistency keeps flow.
- Use a consistent duration range: If most transitions are 8–12 frames, don’t suddenly do 30 frames unless it’s a story beat.
- Repeat a signature transition: Use one main transition style 70% of the time, and a secondary style 30% of the time.
This is how many commercial edits stay polished: there is variety, but it is organized variety.
14. Color and Exposure Bridging
Even if motion is perfect, a transition can feel harsh if color and brightness are drastically different between shots. Professional transitions often include subtle bridging to reduce the “shock” of change.
Bridging options
- Exposure bump: A quick bright flash can hide the cut and reset the eye.
- Short blur dip: A 4–8 frame blur can soften changes in sharpness and lighting.
- Color wash: A subtle color overlay that peaks at the cut can unify the palette.
Use these sparingly. The goal is to guide the eye, not to create a visible effect. If the viewer notices the color trick, it’s too strong.
15. Typography Transitions That Feel Premium
If your edit includes titles, labels, or kinetic typography, smooth transitions are even more important—because the viewer reads text. Reading requires stability. That means your text transitions should be smooth, purposeful, and not overly blurred.
Typography smoothness rules
- Prioritize legibility: Keep text readable for enough frames.
- Use fewer properties: Position + opacity + subtle scale is often enough.
- Motion blur carefully: Blur can make text unreadable; use it only at peak velocity and keep duration short.
- Ease consistently: Text movement should feel like it belongs to the same world as your footage.
A simple premium technique: animate text in with a slight overshoot (very small) and then settle. Overshoot suggests natural motion and adds “life,” but only if it’s subtle.
16. Polishing Pass: The 5-Minute Checklist
Before export, do a quick polish pass. This is where many pros separate themselves: they don’t leave transitions “good enough.” They do a final pass for consistency.
5-minute transition polish checklist
- Peak alignment: Do position, scale, blur, and exposure peaks align logically?
- Edge artifacts: Any visible mask edges, empty borders, or scaling edges?
- Motion blur sanity: Blur only where speed justifies it?
- Timing consistency: Do transitions match the pacing of the music/story?
- Viewer clarity: Is it always clear what the viewer should look at?
Many transition issues aren’t solved by adding more effects—they’re solved by removing clutter and refining curves.
17. Troubleshooting: Why Your Transitions Feel “Off”
Sometimes you follow the steps and the transition still feels wrong. Here are the most common reasons and how to fix them.
Problem: The motion feels jerky
- Cause: Linear keyframes or uneven easing.
- Fix: Use Easy Ease, then shape the speed curve. Check for sudden speed spikes.
Problem: The cut is noticeable
- Cause: Cutting when the frame is too readable.
- Fix: Cut at peak velocity, or add a short blur/exposure bridge on an adjustment layer.
Problem: It feels like an “effect,” not a transition
- Cause: Effects aren’t motivated by motion or story.
- Fix: Start with motion intent. Make the transition follow an existing movement direction.
Problem: It’s smooth but boring
- Cause: Motion lacks energy or contrast.
- Fix: Add a subtle scale push, a tiny rotation, or slightly sharper peak velocity (but keep curves clean).
Problem: Too much blur makes it look cheap
- Cause: Blur is compensating for weak motion design.
- Fix: Reduce blur, refine keyframes. Blur should enhance, not mask problems.
18. Building a Personal Transition System
If you want consistent professional output, you need a system you can repeat. Here’s a simple framework you can apply to almost any transition you build:
- Choose a motivation: motion direction, gesture, music hit, or story beat.
- Build transform motion: position/scale/rotation first. Make it smooth without effects.
- Shape the curve: speed graph with a clean peak and controlled ramps.
- Hide the seam: cut at peak velocity or use a clean mask/bridge.
- Add polish layers: motion blur, subtle exposure shift, or minor chromatic edge.
- Do a consistency pass: ensure peaks align and pacing matches surrounding transitions.
When you work this way, transitions stop being a guessing game. They become a controlled craft.
19. Workflow Speed: Why Templates Matter
Let’s be honest: building everything from scratch every time is not how professionals scale. If you’re delivering content weekly (or daily), you need assets and templates that keep your quality high without blowing up production time. That doesn’t replace skill—templates amplify skill.
A strong template workflow lets you:
- Stay consistent across multiple videos and clients.
- Reduce repetitive setup work (adjustment layers, blur rigs, organized pre-comps).
- Focus on timing and storytelling rather than rebuilding the same transition structure.
- Deliver premium motion even under tight deadlines.
If you want production-ready transitions without rebuilding everything from scratch, explore advanced templates and structured packs. Learn more on our pricing page or study official documentation on Adobe After Effects Help.
20. Practical Transition Ideas You Can Use Immediately
To wrap this smooth transitions tutorial AE guide, here are several transition ideas that are simple to build but look premium when executed with clean curves and good timing. Use them as building blocks rather than strict recipes.
Push + blur bridge
Push clip A out and clip B in while adding a short blur peak on an adjustment layer. Works for almost any footage.
Zoom-through cut
Scale clip A rapidly to 110–120% over 8–10 frames, cut at peak velocity, then decelerate clip B from 120% down to 100%.
Mask wipe with texture
Use a fractal/noise matte to reveal clip B organically. Great for brand and product videos.
Match cut with micro rotation
Align framing across clips and add a subtle rotation shift during the cut for a natural camera feel.
Light flash handoff
Quick exposure flash on the cut to reset the eye and hide the seam. Best used sparingly.
Upgrade Your Motion Toolkit
Scale faster. Edit cleaner. Deliver premium work consistently.
Get unlimited After Effects templatesFAQ
How long should a smooth transition last?
Most professional transitions range between 6–12 frames depending on pacing, the amount of movement, and music timing. Slower, elegant transitions can run longer, but fast edits typically stay within this range for energy and clarity.
Do I always need motion blur?
Not always. Motion blur is most helpful when movement is fast enough to justify it—especially whip pans and quick zooms. For typography, UI-style animation, or slower transitions, too much blur can reduce clarity and look messy.
What is the most common mistake?
Using linear keyframes and stacking heavy effects instead of refining motion curves in the Graph Editor. Smooth transitions usually come from clean timing and controlled acceleration, not from adding more effects.
Should I use the Speed Graph or Value Graph?
For most transition work, the Speed Graph is the fastest path to natural motion because it lets you shape acceleration and deceleration directly. The Value Graph is helpful when you need precise overshoots or complex motion paths.
How do I make transitions feel consistent across a full edit?
Pick a primary transition style (or primary motion direction) and repeat it as your base. Keep transition durations within a consistent range, align peaks to beats, and do a final pass to ensure blur/exposure peaks happen at logical moments.